Today, we’re going to talk about how to connect Google Translation API to Trados. This may sound like a daunting task especially if you don’t have a lot of experience in fiddling with APIs and Google Cloud console, but we tried to lay out the process here as simply as possible so you can follow along and combine the two products for the best synergetic result.
But first things first. What are we trying to do here?
There are two products involved: 1) Google Machine Translation (“MT”), and 2) Trados. Trados can be configured so that, when you move through the segments in a translation project, Trados will automatically make a call to Google Cloud Translation API and get their machine-translated texts.
Will this be helpful to you as a translator?
Yes. Well, yes and no. Yes in a sense that Google MT has come a long way and its translation quality is nothing to be scoffed at. Even if its translations aren’t perfect, you will still be able to find a few decent components that you can work with. In the end, you may find yourself simply having to move the linguistic puzzle pieces around so that the result makes sense to the readers.
On the other hand, Google MT can be a trap. We’ve seen translators who have grown so accustomed to and dependent on Google MT that they don’t check the MT results carefully enough and validate if these machine-generated translations really make sense. Use Google MT to your advantage but never ever rely on it one hundred percent. Oh, and Google MT also may incur some charges but more on that later.
Despite its disadvantages and potential pitfalls, adding Google MT to your translator utility belt will definitely serve to ramp up your productivity.
Let’s assume that you already have a copy of Trados running on your computer. We will begin with creating a Google Cloud project and connecting the Google Translation API.
If you don’t have one already, please create a Google account and follow the steps below.
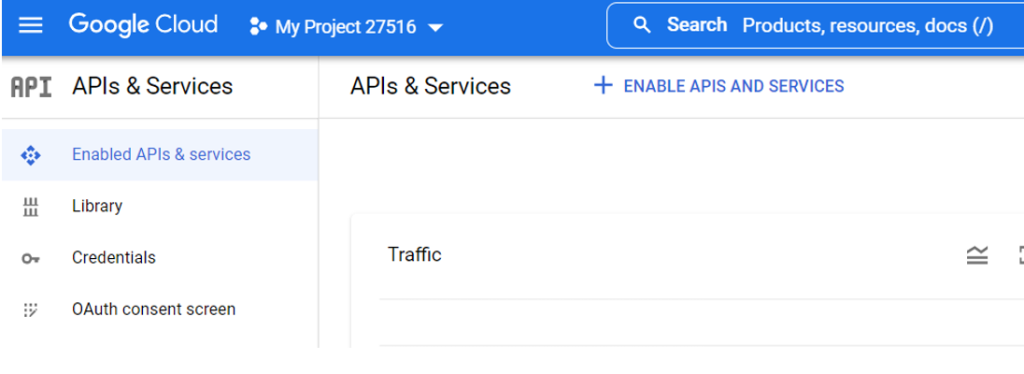
1) Connect to the Google Cloud Console (https://console.cloud.google.com/). This is the dashboard by which you can interact with the cloud services that Google provides.
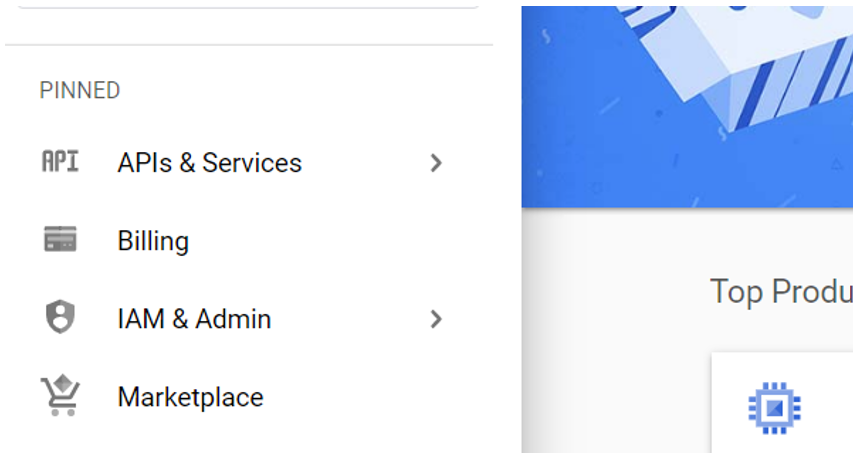
2) Click on “APIs & Services” in the navigation panel on the left of the screen. (If you don’t see a nav bar on the left, try moving your mouse cursor to the left end of the screen. The bar should pop up then.
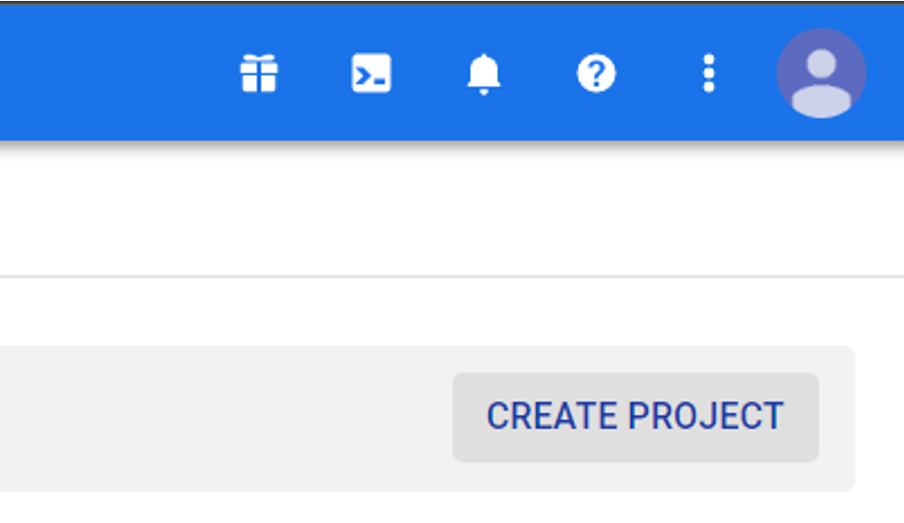
3) Let’s create a project. Click on “CREATE PROJECT” on the right mid-upper side of the screen.
4) Don’t worry too much about the project name. If you are a freelance translator, the likelihood is that you will only do this once and forget about it. Click on “CREATE” and wait until you see the screen changes.
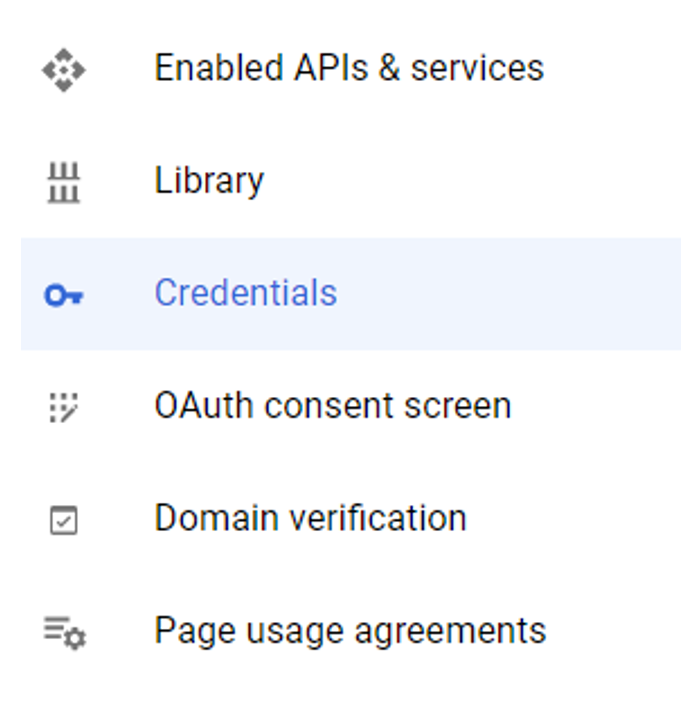
5) Once that’s done, click on “Credentials” on the left panel.
6) Click on “+ CREATE CREDENTIALS” on the top center and then the API key.
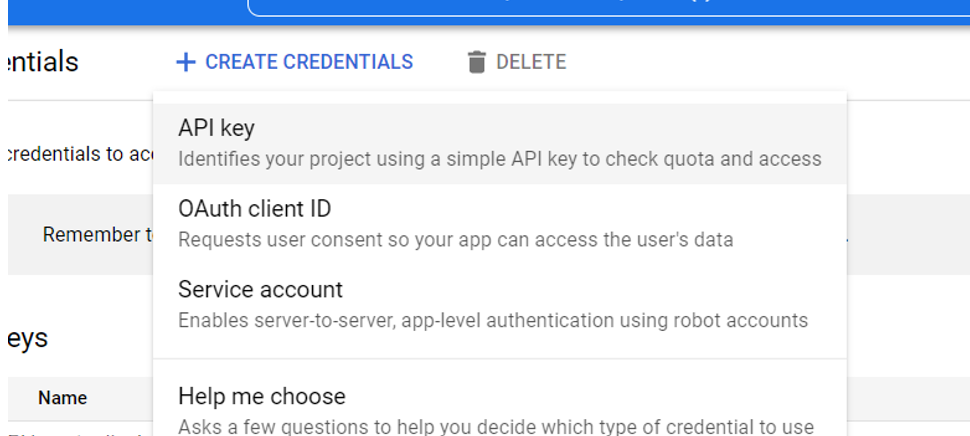
7) Once you see a lengthy line of letters and numbers, copy that. This is your “API key.” This is the key that you will need to interact with Google Cloud services. Notice here we say “services.” This isn’t just for your Google Translation service. This means that if someone gets a hold of your API key, that person may make calls to other pricy Google Cloud services at your expense. To fix that, let’s make sure that this API key can only make calls to the Google Translation service.
8) Click on “Enabled APIs & services” on the left and click on “+ ENABLE APIS AND SERVICES” on the center of the screen.
9) Type “translation” in the search bar and hit enter.
10) Then click on “Cloud Translation API”. And click on the blue ENABLE button.
11) At this point, it will ask you to “ENABLE BILLING.” You can only use the Google Cloud services after you enter your credit card information.
12) Click “ENABLE BILLING” and then “CREATE BILLING ACCOUNT.”
13) Follow along the process you see on the screen and come back to this list once your billing has been set up.
14) Go back to the “Credentials” page and click on the API key you just created.
15) Click on “Restrict key”.
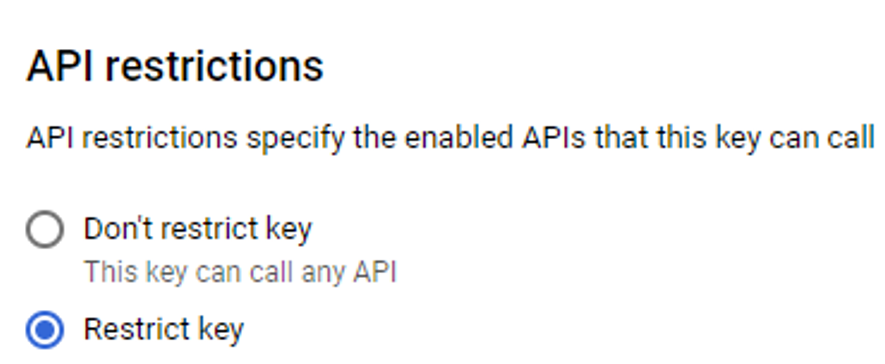
16) Click on the “Select APIs” dropdown and check “Google Translation API.” Your API is now secure and can only make calls to the Google Translation API.
17) Everything is set on the Google side. Now open Trados and let’s stick the API key in there. (If you lost your API key at this point, go to the “Credentials” page and just click on “SHOW KEY” on the right side of the screen and you should be able to copy the value again. Please make sure the key is not exposed to anyone you don’t intend to.)
Okay! If you were able to follow along until now without any issue, please be assured that the most difficult part of all this is now over.
Now, open Trados and follow the steps below.
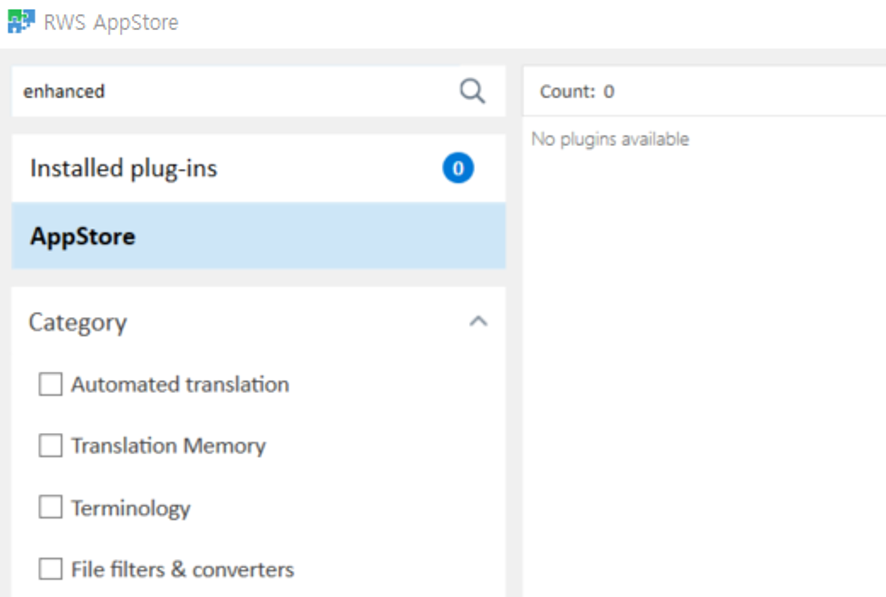
1) Before anything, you have to download a Trados plugin called “MT Enhanced Plugin for Trados Studio”. Downloading this little piece of software may be difficult but there is a couple of ways to go on about it.
A. In Trados, go to the “Add-Ins” tab on the top and click on “RWS AppStore” on the left. Click on “AppStore”. Type “enhanced” on the search bar that you see right on the top of “Installed plugins” button. At this point, you should see on the left the “Enhanced MT” plugin I’m talking about. If you see it, just download that and install it. You are set. Close Trados and start it again.
B. If it doesn’t appear, use this web link to the plugin so you can download directly and install. Once done, restart Trados.
2) Let’s assume you already have a project. If not, you can create a new project when you come to the stage where you have to set the Translation Memory for the project.
3) Click on “Use…” and select “MT Enhanced Trados Plugin”. You see this option because you now have the plugin installed.
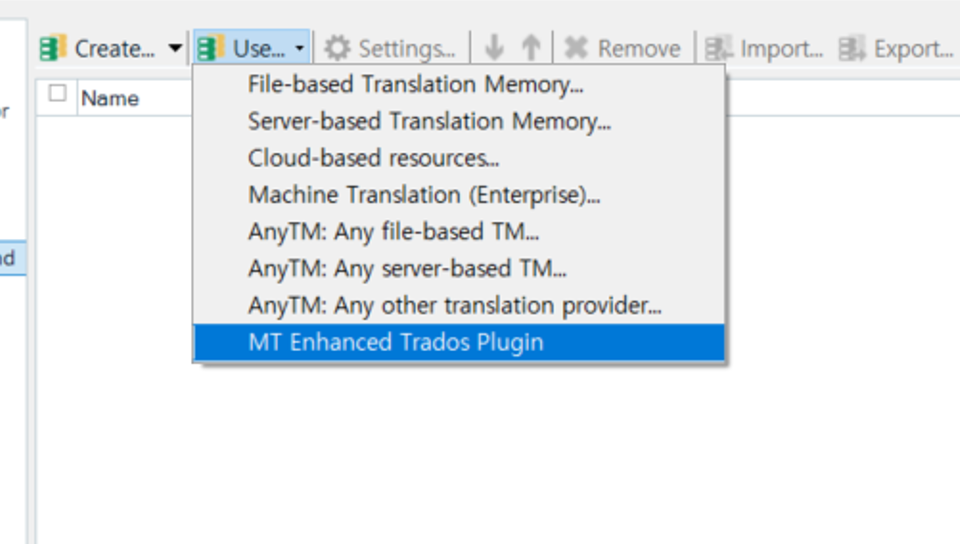
4) Select “Google Translator” in the first dropdown. Select ”V2 – Basic Translation” in the second dropdown. Then in the text field below, copy/paste your Google API key. Check “Save Google key” so Trados will remember the key.
5) Great! Now you have successfully connected the Google API key to Trados. To test this out, open an existing translation file in Trados. Now every time you click on a segment and make it active, you will see that Trados makes a call to the Google API and retrieve the machine-translated texts.
6) If you want to apply MT to all segments, go back to the “Files” view in Trados, right click on the file(s) you want to apply the MT to, and select “Batch Task > Pre-translate files”.
7) Click on “Next” and you will see the “Settings” page where you can make some configurations. Make sure you check “Apply automated translation.” You can also see and apply other options here to make Trados operate the way you want.
8) Click on “Finish” and the MT application to all the files will start. This may take some time, a bit longer than you are used to because Trados has to make an API call to Google Cloud for each segment.
And that’s it! Hope this was helpful!
But before we close this article, let’s touch up on one last thing: Google Cloud service charges.
Google provides you with a monthly free allowance on how many characters you can machine translate. See below.
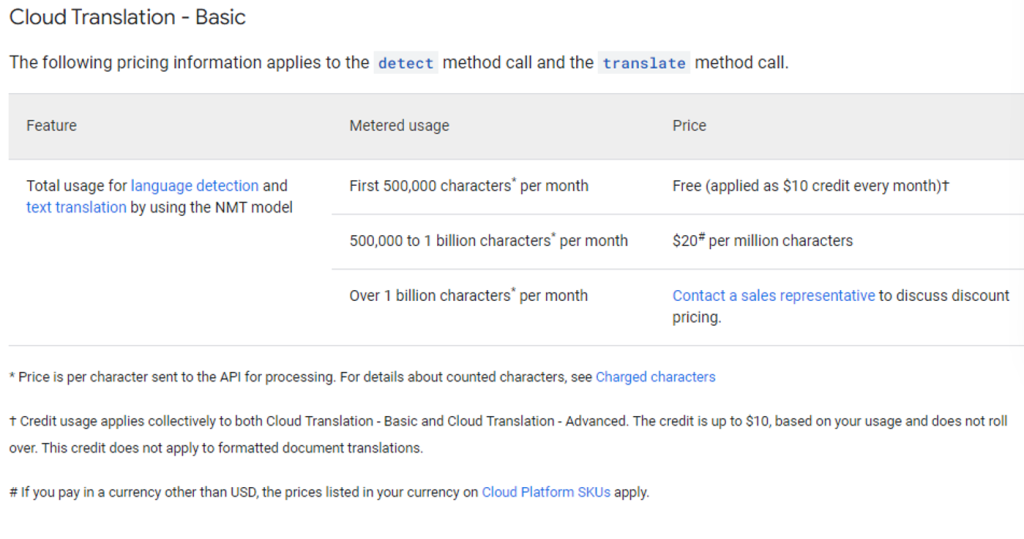
Unless you plan to translate more than 500,000 characters per month, you shouldn’t have to worry about the charges. If you go over 500,000 characters, that will be $20 per million characters.